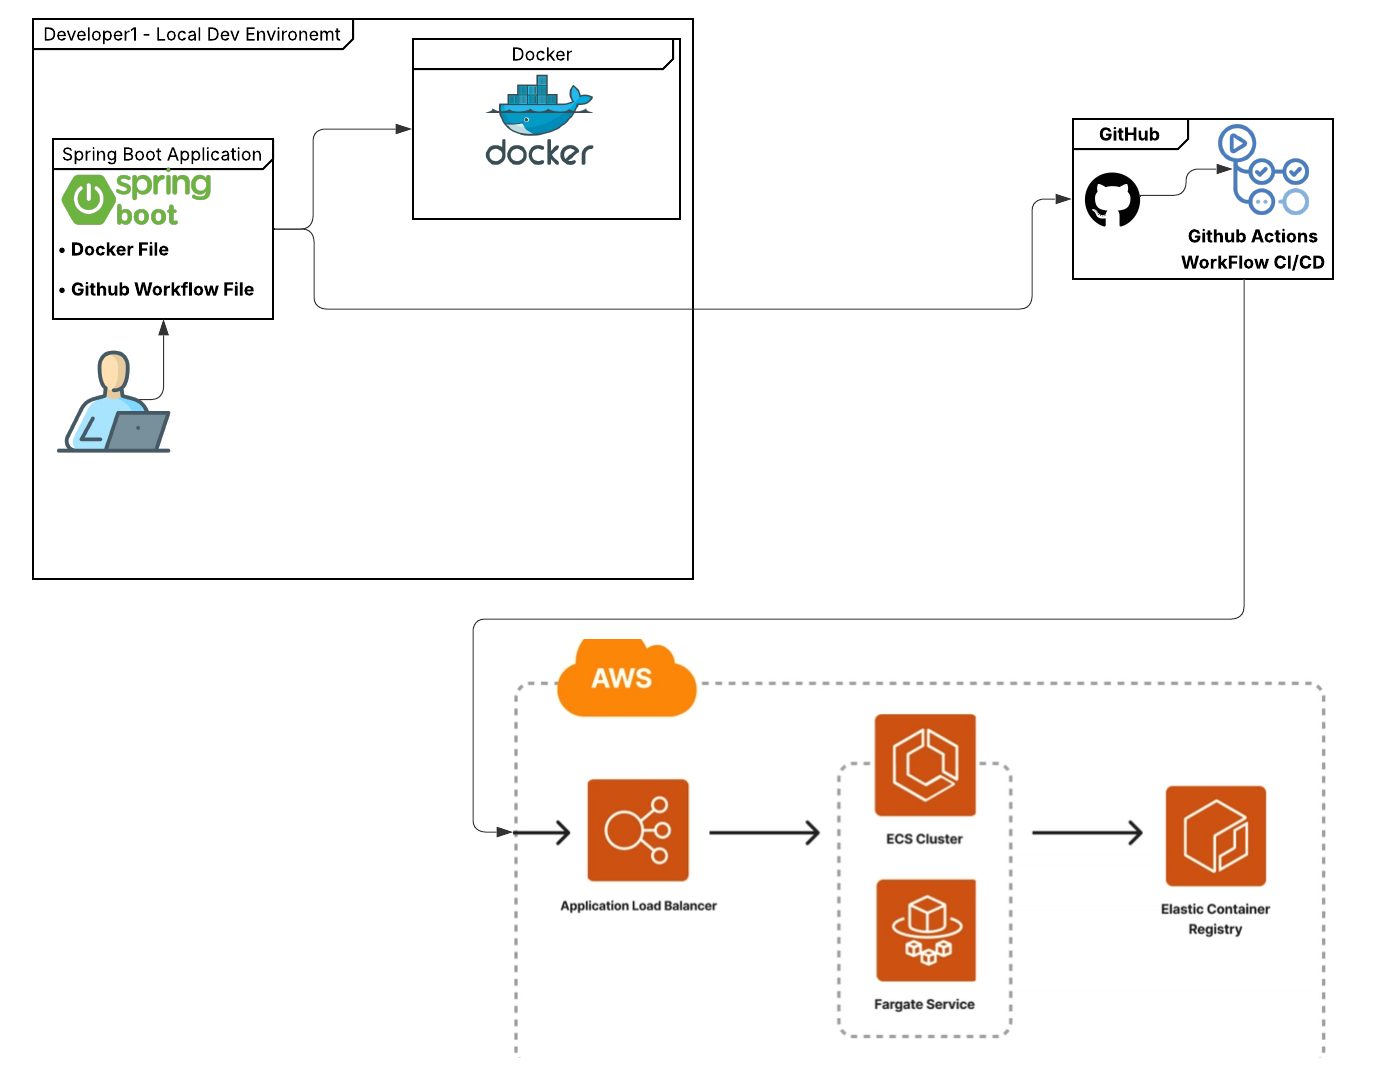
Architecture Overview
My Experience
Hey there! I’m a Software Engineer who recently went through the process of setting up deployment for a Spring Boot application leveraging Docker, GitHub Actions, and AWS ECS Fargate. I wanted to share my experience and the approach that worked well for me. This isn’t meant to be the “definitive guide” or anything like that - just my personal journey and what I found helpful along the way.
Why I Found This Approach Helpful
When I first started working on this project, I was pretty overwhelmed by all the moving parts. But as I got deeper into it, I realized that this combination of tools really made my life easier. Here’s what I discovered:
What I Liked About This Setup
🔄 Automated CI/CD: I was honestly scared of breaking things in production at first, but having automated pipelines gave me confidence. I could push code knowing that tests, builds, and deployments would happen automatically. No more manual steps that I might mess up!
🐳 Docker Made Everything Simpler: This was a game-changer for me. I didn’t have to worry about installing the right JDK version or configuring my local environment. Just Docker, Git, and my IDE - that’s it! And the best part? What I built locally was exactly what would run in production.
🚀 No More “It Works on My Machine”: We’ve all been there, right? This setup eliminated those frustrating moments where something works perfectly on my laptop but breaks in production.
👥 Team Collaboration: When new developers joined our team, they could get up and running super quickly. No complex setup instructions or environment configuration headaches.
What I’ll Share With You
I thought it might be helpful to walk through the main parts of what I learned:
- How Docker Changed My Development Experience: I’ll show you how Docker eliminated those annoying environment issues I used to face
- Setting Up CI/CD with GitHub Actions: How I got automated deployment working (and the mistakes I made along the way!)
- Making Onboarding Easier: How this setup helped new team members get productive quickly
1. How Docker Changed My Development Experience
What I Learned About Dockerfiles
When I first started with Docker, I was confused about how to structure the Dockerfile. After some trial and error, I found that breaking it into stages really helped me understand what was happening:
🔨 Build Stage
- This is where Maven compiles my Spring Boot app into a JAR (I don’t need JDK installed locally!)
- I can run unit tests here if I want
- Creates the final artifact that will run in production
🚀 Runtime Stage
- Takes the JAR from the build stage and puts it in a lightweight container
- Exposes the port my app runs on (usually 8080)
- Sets up the command to run the JAR:
java -jar app.jar
👨💻 Developer Support (Optional)
- I learned I could mount my local source code for faster development with hot reload
The Dockerfile That Worked for Me
Here’s the Dockerfile I ended up with after some experimentation:
# Stage 1: Build JAR
FROM maven:3.9.1-eclipse-temurin-17 AS build
WORKDIR /app
COPY pom.xml .
COPY src ./src
RUN mvn clean package -DskipTests

# Stage 2: Runtime
FROM eclipse-temurin:17-jre-alpine
WORKDIR /app
COPY --from=build /app/target/myapp.jar app.jar
EXPOSE 8080
ENTRYPOINT ["java","-jar","app.jar"]
💡 What I Learned: The multi-stage approach keeps the final image small and only includes what’s needed to run the app. This was a big “aha!” moment for me!
2. Setting Up CI/CD with GitHub Actions
How I Got It Working
I’ll be honest - setting up the CI/CD pipeline was intimidating at first. But once I understood the flow, it made so much sense. Here’s what happens when I push code:
- 🔄 Trigger: GitHub Actions automatically starts when I push to main or feature branches
- 📥 Checkout: It grabs my code from the repository
- 🏗️ Build: Creates a Docker image using the same Dockerfile I use locally
- 🔐 Authenticate: Securely connects to AWS using secrets I configured
- 📤 Push: Uploads the Docker image to Amazon ECR
- 🚀 Deploy: Updates my ECS Fargate service with the new image
My GitHub Actions Workflow
After some research and trial and error, here’s the workflow file that worked for me:
name: Build and Deploy to ECS

on:
  push:
    branches:
      - main
      - 'feature/*'

jobs:
  build-deploy:
    runs-on: ubuntu-latest
    steps:
      - name: Checkout code
        uses: actions/checkout@v3

      - name: Configure AWS credentials
        uses: aws-actions/configure-aws-credentials@v2
        with:
          aws-access-key-id: ${{ secrets.AWS_ACCESS_KEY_ID }}
          aws-secret-access-key: ${{ secrets.AWS_SECRET_ACCESS_KEY }}
          aws-region: us-east-1

      - name: Login to Amazon ECR
        id: login-ecr
        uses: aws-actions/amazon-ecr-login@v2

      - name: Build Docker image
        run: |
          docker build -t myapp:${{ github.sha }} .
          docker tag myapp:${{ github.sha }} ${{ secrets.ECR_URI }}:latest

      - name: Push Docker image to ECR
        run: |
          docker push ${{ secrets.ECR_URI }}:latest

      - name: Deploy to ECS
        run: |
          aws ecs update-service --cluster my-cluster --service my-service --force-new-deployment
🔧 Important: You’ll need to set up these secrets in your GitHub repository settings:
AWS_ACCESS_KEY_IDAWS_SECRET_ACCESS_KEYECR_URI
3. Making Onboarding Easier for New Developers
What New Team Members Need
When I was setting this up, I really wanted to make it easy for new developers to get started. Here’s what they need to have installed:
- Git - For version control
- Docker - For running the application
- IDE - Whatever they prefer (IntelliJ IDEA, VS Code, etc.)
Getting Started (What I Tell New Developers)
Step 1: Get the Code
# Fork the repository on GitHub, then clone your fork
git clone <your-forked-repo-url>
cd <repo-name>
Step 2: Build and Run
# Build the Docker image
docker build -t myapp:dev .

# Run the application
docker run -p 8080:8080 myapp:dev
Step 3: Check It’s Working
Open your browser and go to http://localhost:8080 - you should see the application running!
How I Work on Features
1. Plan the Feature
- Create a GitHub Issue to describe what I want to build
- Get feedback from the team before I start coding
2. Create a Feature Branch
git checkout -b feature/<issue-id>-<short-description>
3. Develop and Test
# Work on my feature code
# Build and test locally using Docker
docker build -t myapp:dev .
docker run -p 8080:8080 myapp:dev

# Run tests to make sure I didn't break anything
docker run myapp:dev mvn test
4. Commit and Push
git add .
git commit -m "ISSUE-123: Add new payment validation feature"
git push origin feature/<issue-id>-<short-description>
5. Create Pull Request
- Create a pull request to the main repository
- Include the issue ID in the description
6. Code Review
If approved:
- Merge the PR and I’m done! 🎉
If changes are needed:
# Make the requested changes
git add .
git commit --amend
git push -f origin feature/<issue-id>-<short-description>
What Happens After I Merge
Once my PR gets merged, the magic happens automatically:
- 🤖 GitHub Actions builds the Docker image for me
- 📤 Pushes the image to AWS ECR
- 🚀 Updates my ECS Fargate service with the new deployment
- ✅ I don’t have to touch AWS at all!
🎯 What I Love About This: I can focus on writing code and building features instead of worrying about deployment infrastructure.
🎯 What I Learned From This Experience
Looking back on this journey, here’s what really stood out to me:
✅ What Made My Life Easier
- Simple Setup: I only need Git, Docker, and an IDE to get started on any project
- No Environment Headaches: The same Dockerfile works everywhere - locally, in CI/CD, and in production
- Confident Testing: I can test everything locally with Docker before pushing, which saves me from embarrassing mistakes
✅ What Helped Our Team
- Quick Onboarding: New developers can start contributing really fast
- No More “Works on My Machine”: We eliminated those frustrating debugging sessions
- Everyone’s on the Same Page: We all follow the same process, which makes collaboration smoother
✅ What Made Production Deployments Better
- Automated Everything: GitHub Actions handles the deployment, so I don’t have to worry about manual steps
- Same Build Everywhere: What I build locally is exactly what runs in production
- Reliable Releases: The automated process gives me confidence that deployments will work
My Message 💬
I hope sharing my experience was helpful! I’m still learning and growing as a developer, and I’d love to hear from you.
If you have any questions about this approach, suggestions for improvements, or just want to share your own experiences with Spring Boot deployment, please don’t hesitate to reach out:
- Email: lemrabott.toulba@gmail.com
- Contact Form: Use the contact button on my website
I’m always excited to learn from others and discuss different approaches to deployment and DevOps. Whether you’re a fellow junior developer figuring things out or someone with more experience who can share some wisdom, I’d love to hear from you!